截取DOM可见区域(html2canvas)
The script allows you to take “screenshots” of webpages or parts of it, directly on the users browser. The screenshot is based on the DOM and as such may not be 100% accurate to the real representation as it does not make an actual screenshot, but builds the screenshot based on the information available on the page.
Usage
The html2canvas library utilizes Promises and expects them to be available in the global context. If you wish to
support older browsers that do not natively support Promises, please include a polyfill such as
es6-promise before including html2canvas.
To render an element with html2canvas, simply call:html2canvas(element[, options]);
The function returns a Promise containing the <canvas> element. Simply add a promise fulfillment handler to the promise using then:
html2canvas(document.body).then(function(canvas) {
    document.body.appendChild(canvas);
});
How does it work
The script renders the current page as a canvas image, by reading the DOM and the different styles applied to the elements.
It does not require any rendering from the server, as the whole image is created on the client’s browser. However, as it is heavily dependent on the browser, this library is not suitable to be used in nodejs. It doesn’t magically circumvent any browser content policy restrictions either, so rendering cross-origin content will require a proxy to get the content to the same origin.
The script is still in a very experimental state, so I don’t recommend using it in a production environment nor start building applications with it yet, as there will be still major changes made.
截取DOM完整区域(dom-to-image)
dom-to-image is a library which can turn arbitrary DOM node into a vector (SVG) or raster (PNG or JPEG) image, written in JavaScript. It’s based on domvas by Paul Bakaus and has been completely rewritten, with some bugs fixed and some new features (like web font and image support) added.
Installation
NPM
npm install dom-to-image
Then load
1 | /* in ES 6 */ |
Bower
bower install dom-to-image
Include either src/dom-to-image.js or dist/dom-to-image.min.js in your page
and it will make the domtoimage variable available in the global scope.
1 | <script src="path/to/dom-to-image.min.js" /> |
Usage
All the top level functions accept DOM node and rendering options,
and return promises, which are fulfilled with corresponding data URLs.
Get a PNG image base64-encoded data URL and display right away:
1 | var node = document.getElementById('my-node'); |
Get a PNG image blob and download it (using FileSaver,
for example):
1 | domtoimage.toBlob(document.getElementById('my-node')) |
Save and download a compressed JPEG image:
1 | domtoimage.toJpeg(document.getElementById('my-node'), { quality: 0.95 }) |
Get an SVG data URL, but filter out all the <i> elements:
1 | function filter (node) { |
Get the raw pixel data as a Uint8Array
with every 4 array elements representing the RGBA data of a pixel:
1 | var node = document.getElementById('my-node'); |
All the functions under impl are not public API and are exposed only
for unit testing.
Rendering options
filter
A function taking DOM node as argument. Should return true if passed node
should be included in the output (excluding node means excluding it’s
children as well). Not called on the root node.
bgcolor
A string value for the background color, any valid CSS color value.
height, width
Height and width in pixels to be applied to node before rendering.
style
An object whose properties to be copied to node’s style before rendering.
You might want to check this reference
for JavaScript names of CSS properties.
quality
A number between 0 and 1 indicating image quality (e.g. 0.92 => 92%) of the
JPEG image. Defaults to 1.0 (100%)
cacheBust
Set to true to append the current time as a query string to URL requests to enable cache busting. Defaults to false
imagePlaceholder
A data URL for a placeholder image that will be used when fetching an image fails. Defaults to undefined and will throw an error on failed images
How it works
There might some day exist (or maybe already exists?) a simple and standard
way of exporting parts of the HTML to image (and then this script can only
serve as an evidence of all the hoops I had to jump through in order to get
such obvious thing done) but I haven’t found one so far.
This library uses a feature of SVG that allows having arbitrary HTML content
inside of the <foreignObject> tag. So, in order to render that DOM node
for you, following steps are taken:
Clone the original DOM node recursively
Compute the style for the node and each sub-node and copy it to
corresponding clone- and don’t forget to recreate pseudo-elements, as they are not
cloned in any way, of course
- and don’t forget to recreate pseudo-elements, as they are not
Embed web fonts
find all the
@font-facedeclarations that might represent web fontsparse file URLs, download corresponding files
base64-encode and inline content as
data:URLsconcatenate all the processed CSS rules and put them into one
<style>
element, then attach it to the clone
Embed images
embed image URLs in
<img>elementsinline images used in
backgroundCSS property, in a fashion similar to
fonts
Serialize the cloned node to XML
Wrap XML into the
<foreignObject>tag, then into the SVG, then make it a
data URLOptionally, to get PNG content or raw pixel data as a Uint8Array, create an
Image element with the SVG as a source, and render it on an off-screen
canvas, that you have also created, then read the content from the canvasDone!
Things to watch out for
if the DOM node you want to render includes a
<canvas>element with
something drawn on it, it should be handled fine, unless the canvas is
tainted -
in this case rendering will rather not succeed.at the time of writing, Firefox has a problem with some external stylesheets
(see issue #13). In such case, the error will be caught and logged.
截取全页面
利用html2canvas
1 | html2canvas(document.body).then(function (canvas) { |
说明:动态添加的元素会是空白
利用dom-to-image
1 | var node = document.body; |
说明:效果有时也不理想
截取Canvas
调用canvas.toDataURL(),获取canvas数据后,保存为图片
有如下<canvas>元素
1 | <canvas id="canvas" width="5" height="5"></canvas> |
可以用这样的方式获取一个 data-URL
1 | var canvas = document.getElementById("canvas"); |
设置jpeg图片的质量节
1 | var fullQuality = canvas.toDataURL("image/jpeg", 1.0); |
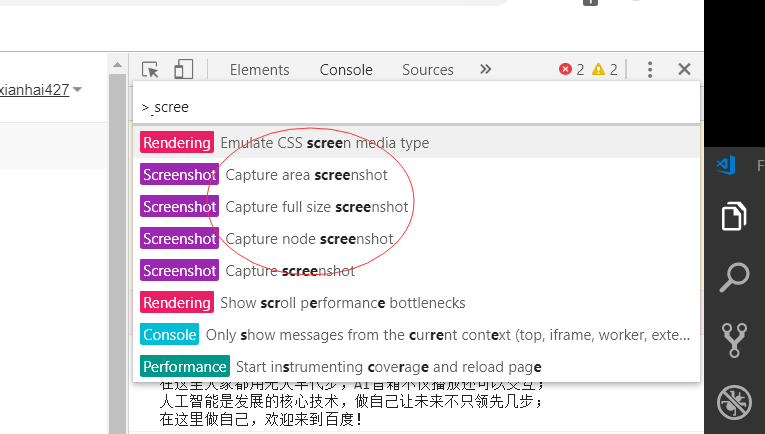
Chrome截图
Chrome截图方法:
1、ctrl + shift + i
2、ctrl +shift + p
3、搜索”screen”
参考资源
1、https://github.com/tsayen/dom-to-image
2、https://blog.csdn.net/u012260672/article/details/79302465
3、https://github.com/niklasvh/html2canvas/
4、http://caibaojian.com/html2canvas.html
5、http://html2canvas.hertzen.com/
6、https://www.jb51.net/article/128554.htm